Delving into the Robotic Operating System (ROS)
An Aerial View
Initiating my journey with F1Tenth, the preliminary lecture provides an overarching perspective of the entire course along with a concise introduction to autonomous racing. The essence of this lecture revolves around stirring up students’ interest and laying down a roadmap of what awaits them throughout the course.
Post the inaugural lecture, my next stop was the first tutorial. The slides available on the website give a cursory glance at the F1Tenth simulator, its installation process, and the manual operation of the car within the simulator via a keyboard. To delve deeper, I turned to lecture videos by Prof. Madhur Behl from the University of Virginia, available here and here. I devoted my time to the first five videos up until [F1/10 Lectures] Online ROS F1/10 Simulator, to master the rudiments of ROS, a prerequisite for Lab1 Assignment. Below, I have enumerated some salient points from these lectures that merit recollection.
Fundamentals of ROS
Although the ROS wiki is a treasure trove of tutorials for learning the basics of ROS, I will highlight the key takeaways from the initial lecture. The focus was primarily on ROS as a middleware, adept at managing communication among various segments of the autonomous car. Here are some fundamental components of ROS:
- Nodes: These are programs designed for specific functionality. Operating as independent processes, nodes interact with each other using topics and messages. Nodes are written using the client library, with roscpp and rospy being the main ones for C++ and Python respectively. There also exist experimental client libraries such as R and Java.
- The ROS Master is a unique node that is always running and doesn’t necessitate user-defined codes. It enables nodes to interchange messages. To launch the ROS Master Node, use the command:
>>> roscore
- Topics: These are the channels facilitating message exchange among nodes. Nodes can either subscribe to or publish on a topic. Given their many-to-many relationship, a topic can have multiple publishers and subscribers, but only one type of message.
- Messages: These are strongly-typed data structures designated for a topic.
- Packages: They constitute a part of the software that may contain one or more nodes.
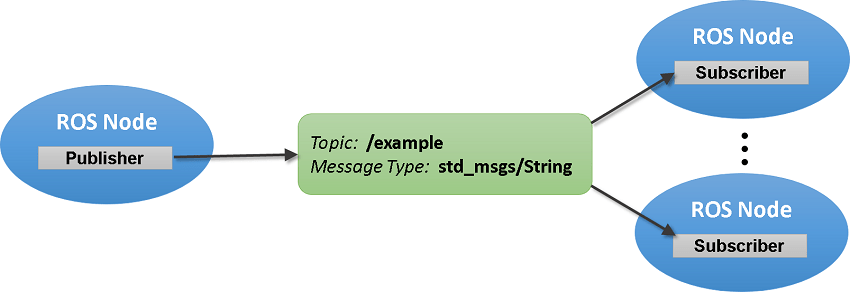
The interplay of ROS Publishers, Subscribers, Messages, and Topics is beautifully articulated at mathworks.com, elucidated with the following illustration:
Next on my agenda was the turtlesim tutorial, aptly referred to as the “Hello World” of ROS. You can find the tutorial at the ROS wiki.
Subsequent to this, I proceeded to the lecture on ROS filesystem. While this topic is indispensable for effective work in ROS, it’s best understood through hands-on practice within turtlesim or your own ROS project. So, what exactly is ROS filesystem? It streamlines the build process of a project while furnishing the necessary tools and flexibility to decentralize its dependencies. The crux of the lecture hinged on catkin, the cakin_make command, and importantly, the package.xml and CMakeLists.txt files within the ROS package.
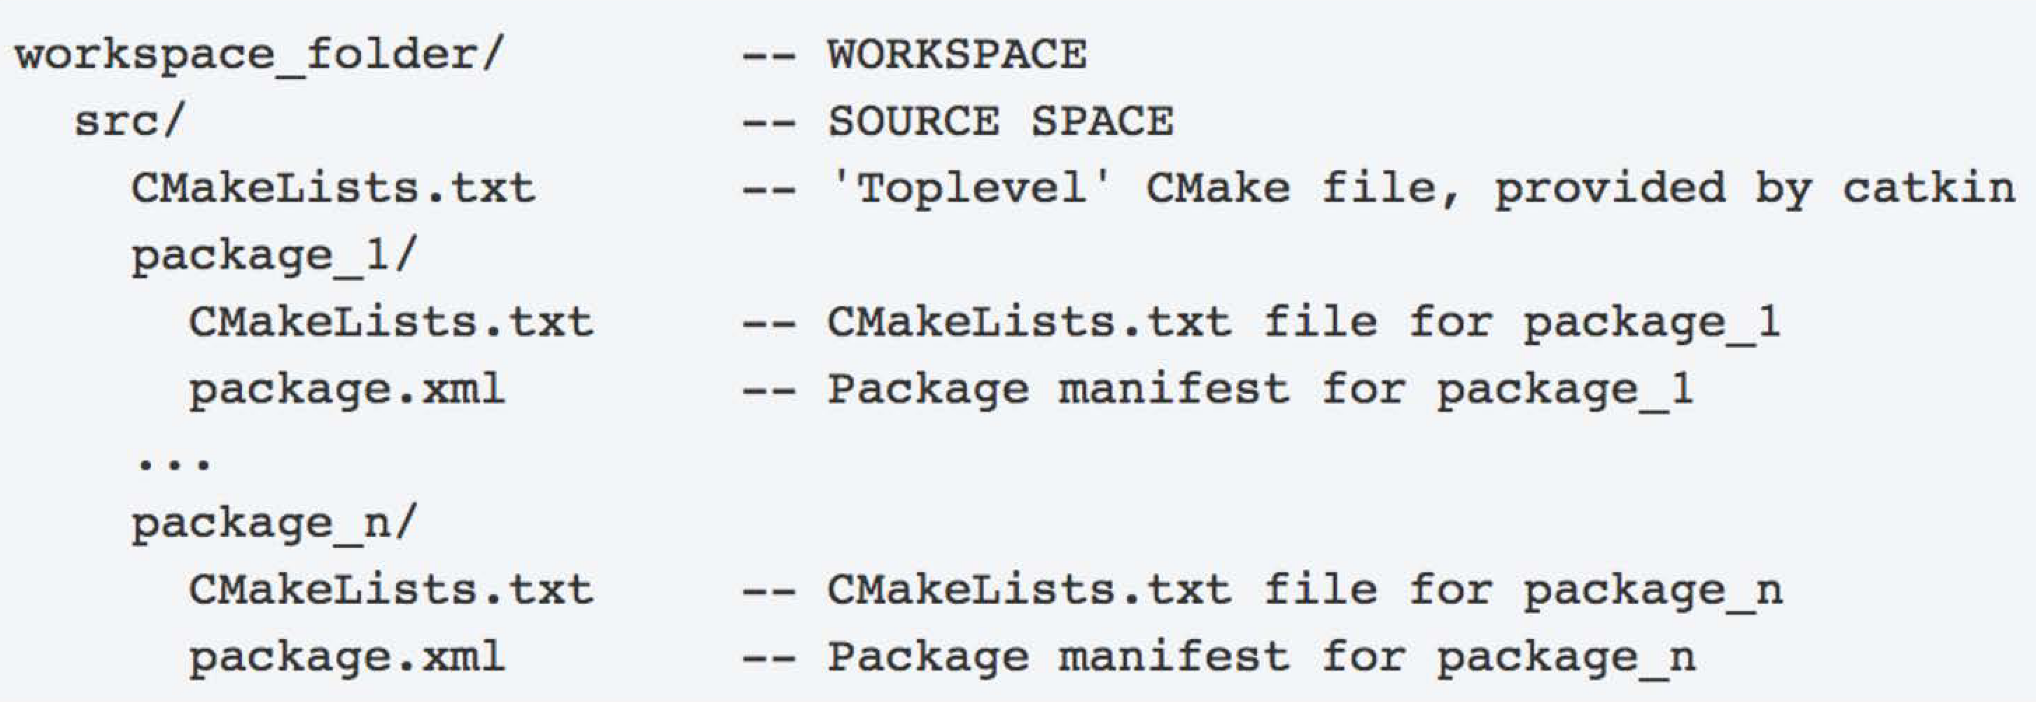
- Catkin: This is ROS’s build system responsible for generating executables and libraries. It is an extension of CMake from the C programming language, augmented with ROS-specific features. Catkin lends more standard compliance to the package, enhancing its reusability among programmers. The figure below depicts the organization of the catkin workspace (sourced from UV F1/10 lecture).
- Package.xml: This file houses the meta-information of a package such as its name, description, version, license, and dependencies.
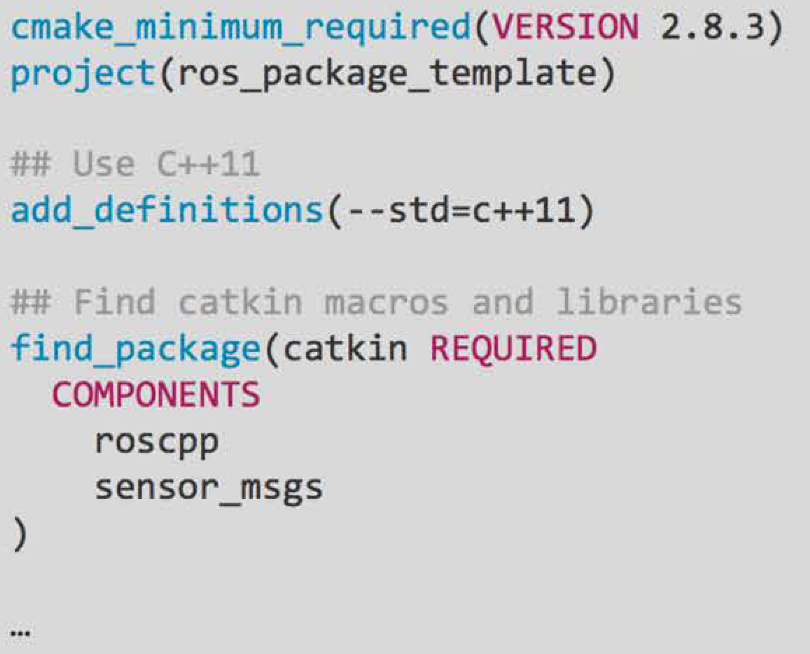
- CMakeLists.txt: As the main CMake file, it is instrumental in building the package and invoking catkin-specific functions. Below is an exemplification of how a rudimentary CMakeLists.txt should appear (sourced from UV F1/10 lecture):
CMakeLists.txt
I then transitioned to the subsequent video and Lecture 3 from the University of Virginia, highlighting one of the pivotal concepts in ROS: Publishers and Subscribers. This lecture opens with an illustration of the rospy client library, elucidating the initialization of a ROS Node with:
rospy.init_node('my_node_name')
and
rospy.init_node('my_node_name', anonymous=True)
The former informs ROS that this code is a ROS node named ‘my_node_name’, which must be unique. The latter parameter, anonymous=True, creates a unique name by appending a unique id to the node name. To prevent the node from being terminated immediately after a single run, we use:
rospy.spin()
This keeps the node active by utilizing some CPU cycles.
The Publisher
A ROS Publisher broadcasts a message to a particular topic. The syntax of rospy’s publisher is as follows:
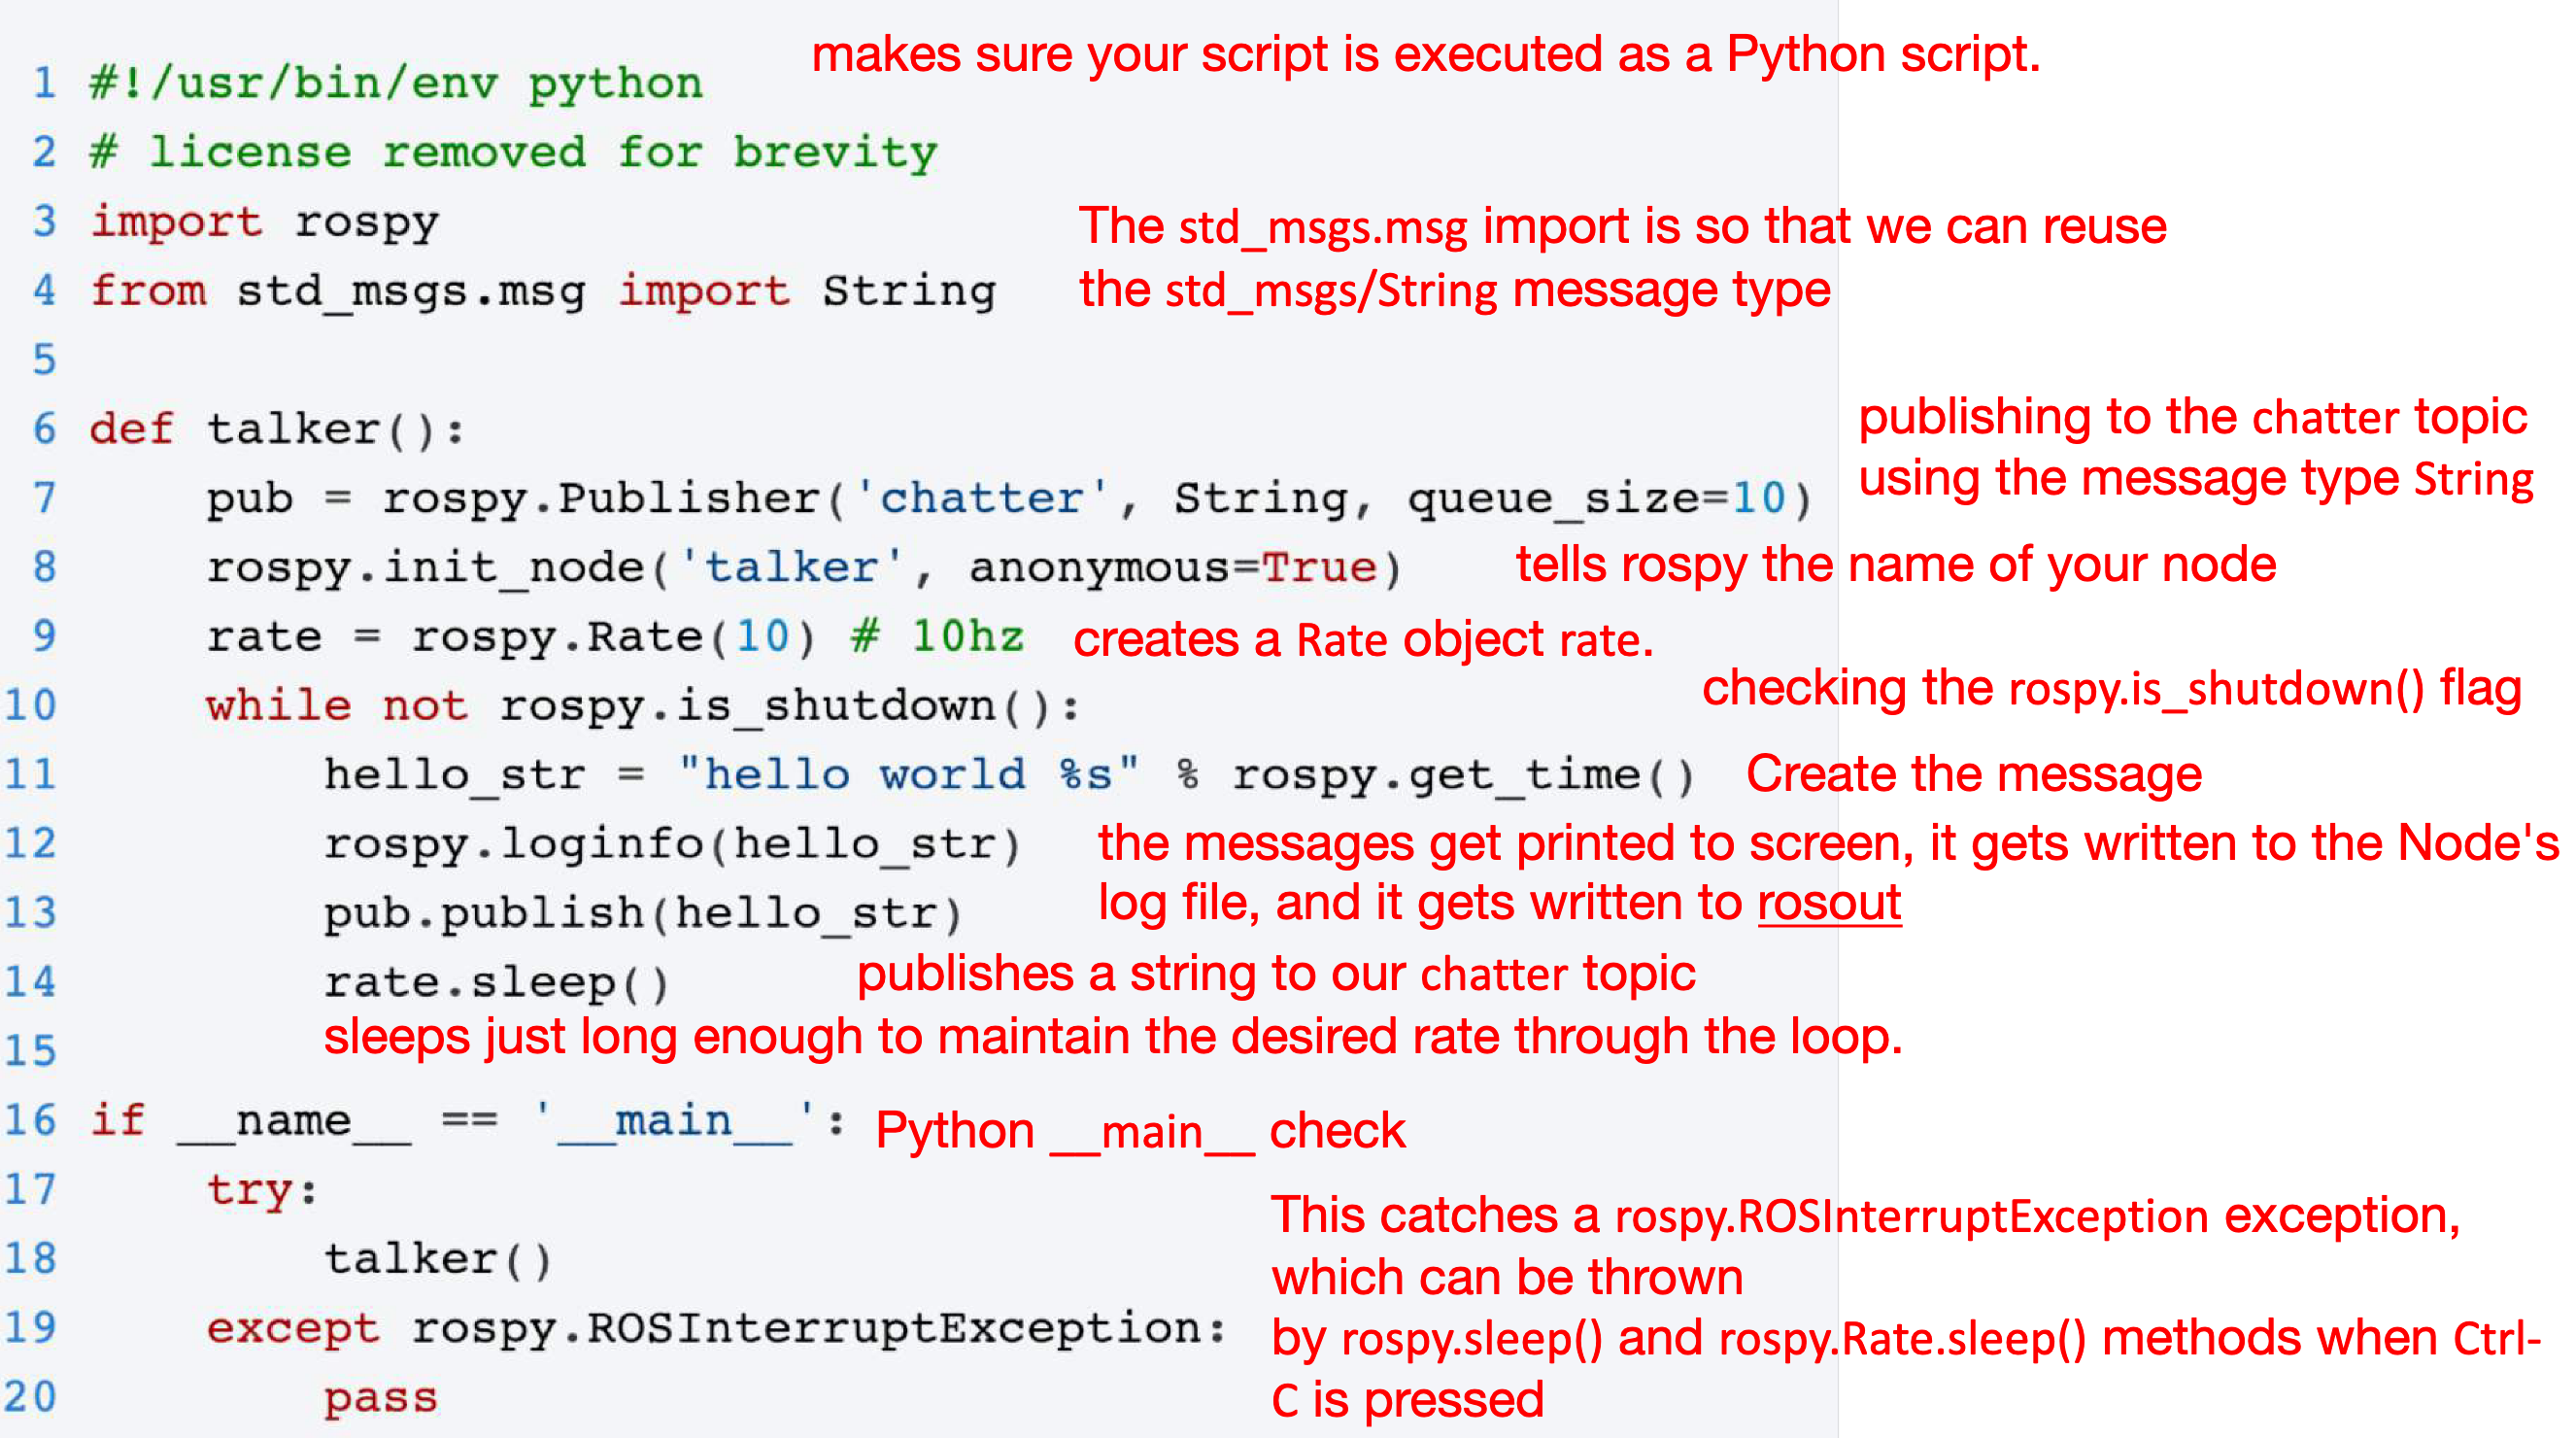 Example of Publisher Node with explanation of what each line is doing, ref: UV F1/10 lecture
pub = rospy.Publisher('topic_name', message_type, queue_size=size)
The Subscriber
A ROS Subscriber listens to the messages on a topic. Here is the syntax for rospy’s subscriber:
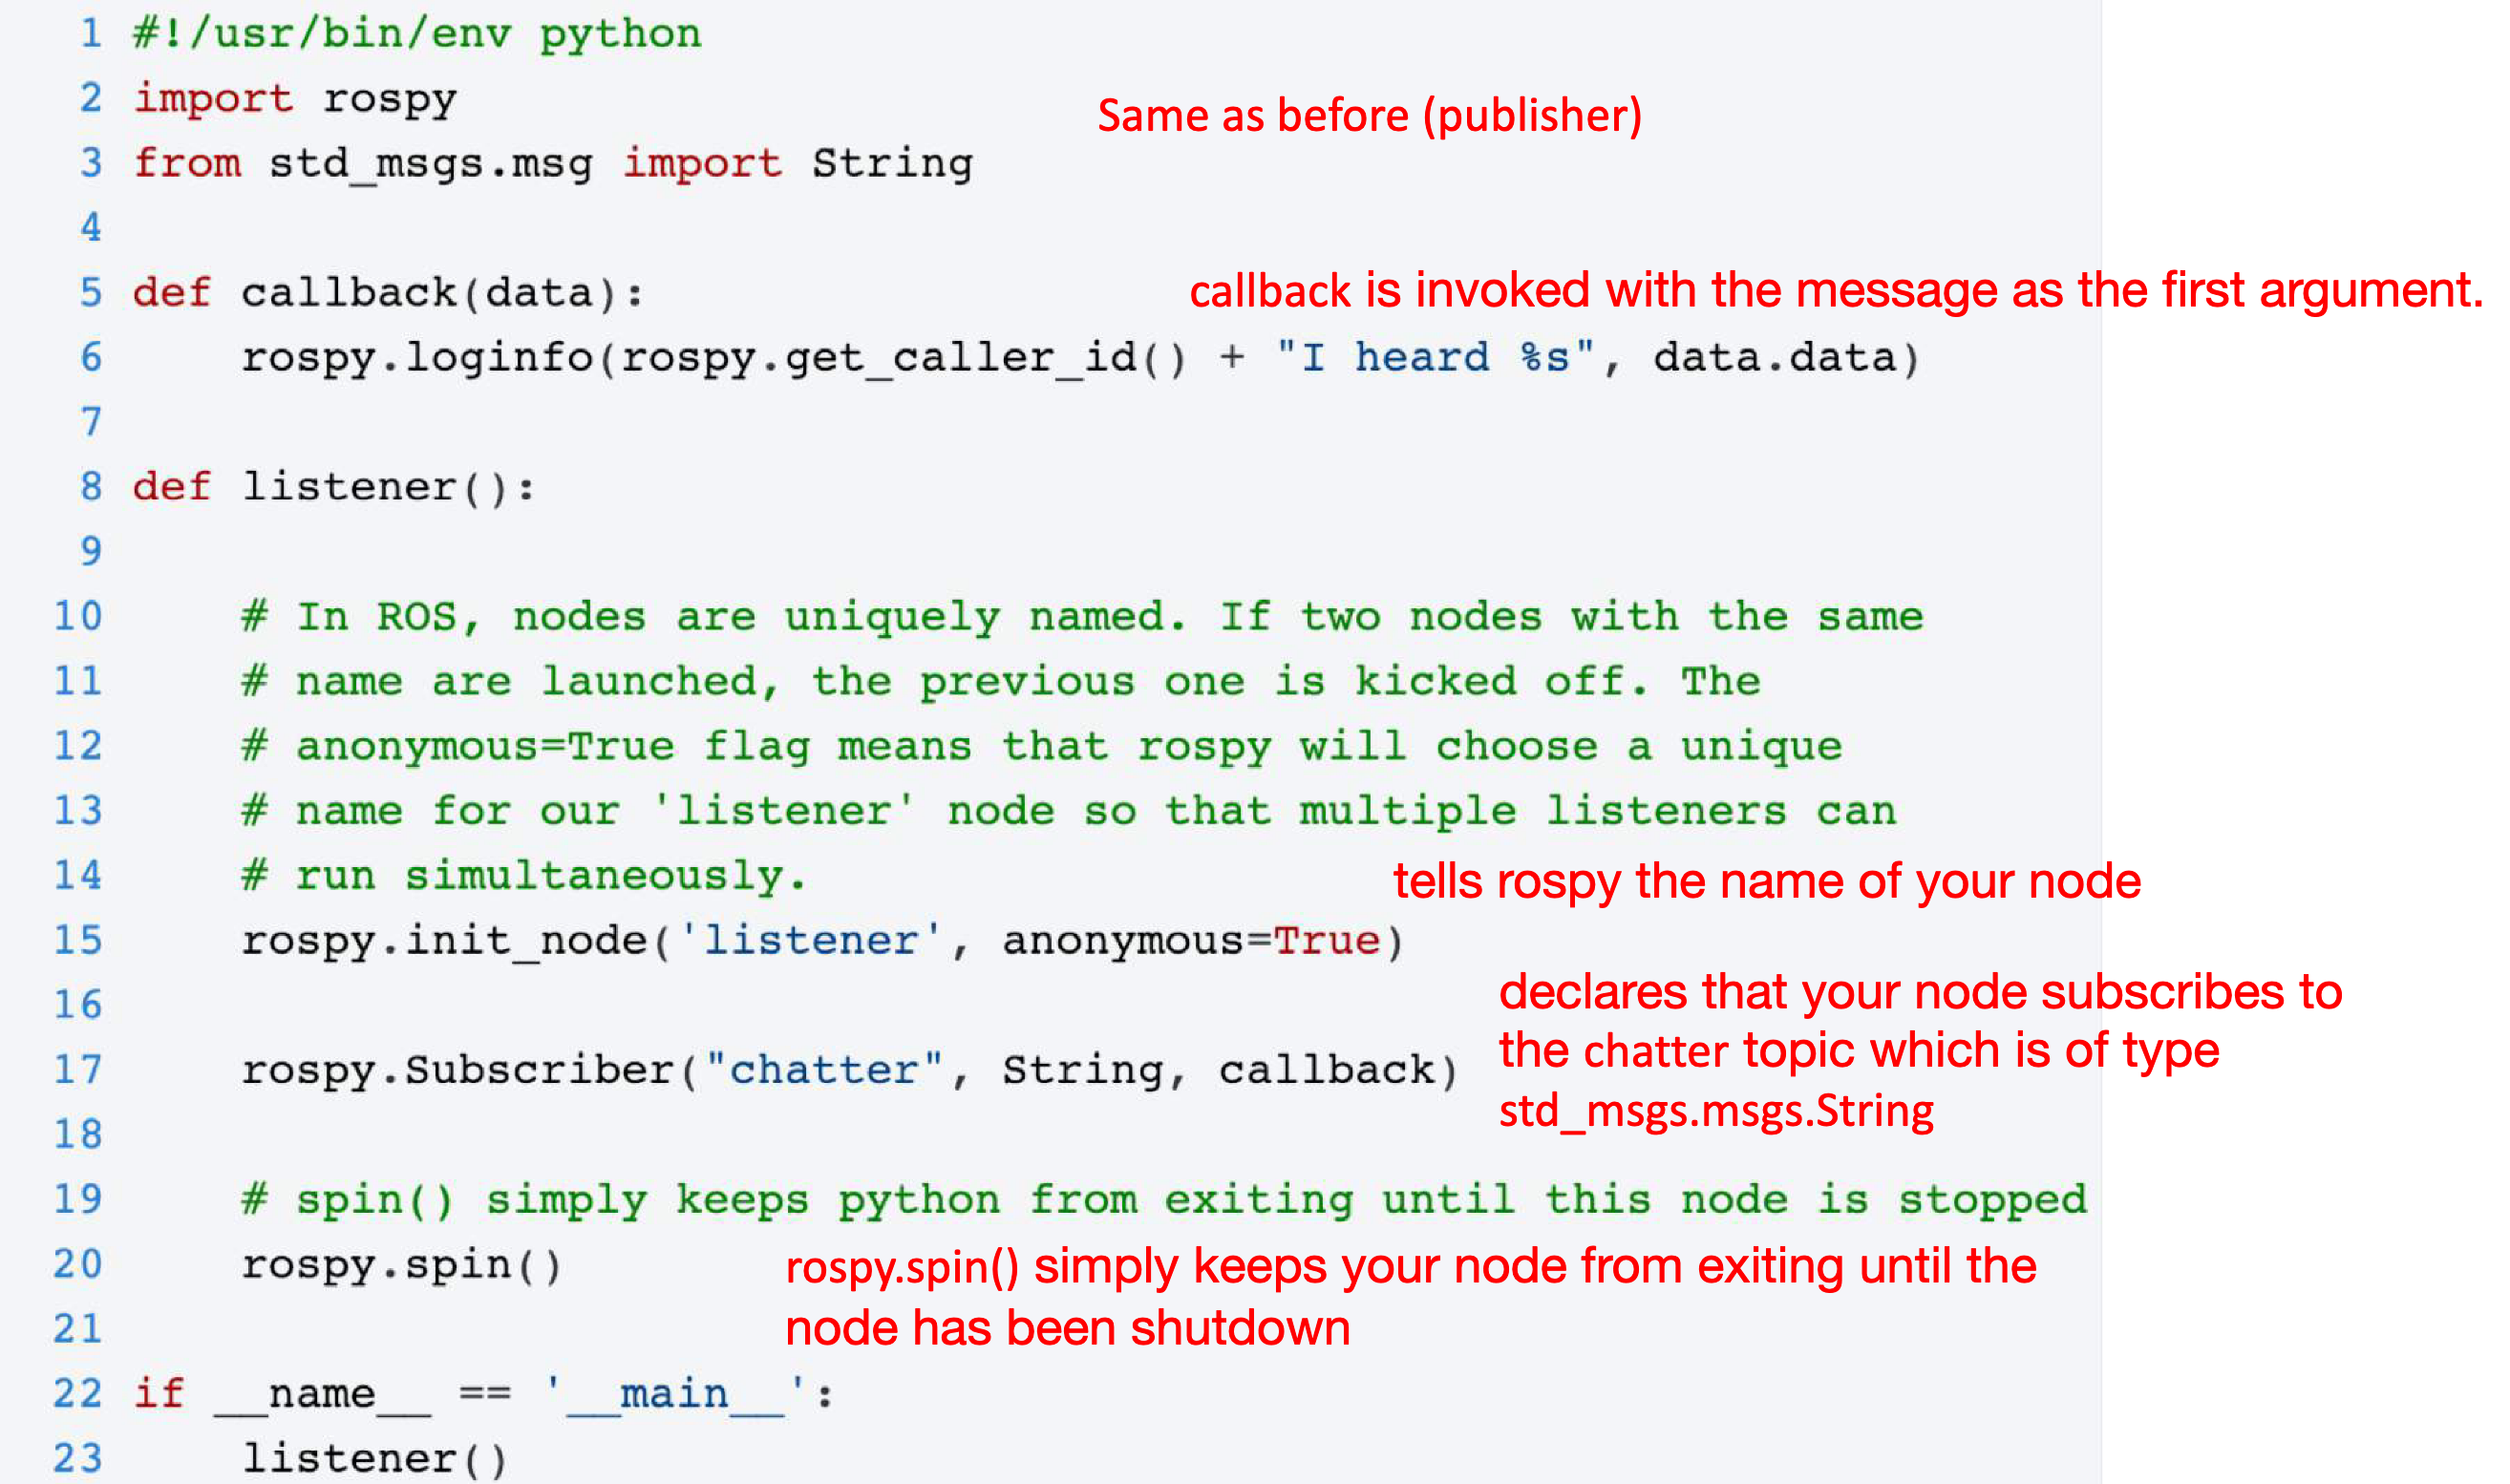
sub = rospy.Subscriber('topic_name', message_type, callback_function)
The callback function is executed every time a message is received on the topic. This function typically processes the data and carries out the necessary actions.
Example of Subscriber Node with explanation of what each line is doing, ref: UV F1/10 lecture The next video is hands on ROS commands and exploring the workspace from terminal available here. It is great hands-on experience of all the lectures before and worth trying it and following along.
I delved deeper into the intricacies of ROS Messages. As I mentioned earlier, ROS messages are strongly typed, i.e., their structure is known and checked at compile time. ROS provides a lot of built-in message types for common data types like integers, floating-point numbers, strings, time and duration, etc., and complex data structures as well. But, you are free to define your own messages if the built-in ones don’t suit your needs. ROS messages are defined in “.msg” files, and each file describes a single message. These “.msg” files are located inside the “msg” directory of a package. Once these files are created or modified, we have to modify the package.xml and CMakeLists.txt files and build the package using catkin_make.
The syntax of a “.msg” file is very simple. It is a text file where each line contains a type and a variable name, separated by a space. For example, the definition of a Twist message, which is frequently used to command robot velocities, is:
geometry_msgs/Vector3 linear
geometry_msgs/Vector3 angular
This message contains two fields: linear and angular, and each field is of type Vector3 (which itself is another message defined in geometry_msgs package).
The hands-on part of this lecture involved a couple of exercises where I had to write a publisher and a subscriber node in Python. The exercises were quite detailed and practical and required me to go back and forth between the ROS documentation, lecture videos, and the actual code. It was an excellent exercise to get comfortable with the ROS programming environment and tools.
I wrapped up this week by watching a couple of additional videos on ROS services and parameters, but I am yet to practice them. I hope to cover those topics in the upcoming week. In a nutshell, a ROS Service is another way for nodes to communicate with each other. It is a synchronous method, where one node sends a request to another, and the other node sends a response. A ROS Parameter is a way to store data that is shared among nodes and is not expected to change often. Parameters are stored on a Parameter Server and can be set, get, and deleted using ROS command line tools or programmatically using rospy or roscpp.
On a final note, I would like to say that this week was quite intense but also very satisfying. The learning curve is indeed steep, but the hands-on approach is very effective and engaging. I look forward to the upcoming weeks of this journey.
The Great Turtle Odyssey
To fortify my mastery of ROS, I’ve embarked on another adventure, this time on board the F1/10 course from the University of Virginia. Four thrilling tasks awaited me, starring the turtle from the turtlesim tutorial, who turned out to be quite the artist!
Task one invited me to create the swim_school.py node. The objective was simple: to make our aquatic friend trace a figure 8. A seemingly straightforward mission, you’d think? Not quite. I could control the turtle’s linear and angular velocities, but due to slight discrepancies in the turtle’s pose.theta and rospy.rate, it was challenging to make the turtle stick to the figure 8 after each round.
Attempt number one involved creating a subscriber in the node that would flip the turtle’s angular velocity when the pose.theta was near zero. However, this wasn’t quite accurate enough. I tried increasing the queue size and rospy.rate to 1000Hz, hoping for more pose.theta values, but that still fell short.
So, I shifted my strategy. Using the user-defined linear and angular velocities, I calculated the radius of the circle the turtle would draw and hence its circumference. By tracking the turtle’s journey in each loop, I could tell when it had traveled the distance equivalent to the circle’s circumference and, at that point, reverse the angular velocity. But even this wasn’t enough, so I combined this strategy with the less accurate pose.theta check from my first attempt. The result? A graceful figure 8 sketched out by my diligent turtle.
On to task two, the random_swim_school.py. This was an invigorating challenge, as it introduced an element of uncertainty. Both the turtle’s initial position and its linear and angular velocities were randomized. The suspense was real, and the outcome was different each time!

Task three demanded a shift from free-flowing curves to strict right angles. In back_to_square_one.py, the turtle had to sketch a square with the lower-left corner at position (1,1). The side length was an input from yours truly, within a range of 1 to 5.
Finally, the last task called for precision navigation. I had to direct the turtle to a specific user-defined location.
The F1Tenth Circuit
The first Lab of the F1Tenth course offered an intense deep-dive into the inner workings of ROS, from understanding its directory structure and framework to implementing simple subscribers and publishers, and mastering messages.
I got to grasp the nuts and bolts of CMakeLists.txt and package.xml, delve into package dependencies, and design my own launch files. Plus, I learned how to maneuver with RViz and wrangle Bag files.
My objective was to develop a ROS package with a node (either in C++, Python, or both), a launch file, and a custom message. This combo had to subscribe to the laser_scan topic and publish the distance to the closest and farthest obstacles. I decided to tackle this in both C++ and Python to get a grip on both languages. C++ was a bit rusty, especially when it came to iterating through the vector of laser_scan message ranges. But with a little bit of help from some basic tutorials, I managed to get it back on track. The final package, as per the task’s requirements, is ready and roaring to go.